What you will learn:
- What is an Arduino?
- How do you use one?
- How do you program one?
- What are its components?
- What does it do?
- Why is it important?
- Arduino IDE
- How do you load this up?
- C++ code, what is this?
- What is
Serial.println()? - You will make your own "hello world" code with the Arduino at the end.
Lesson:
The arduino is a tiny computer that takes instructions from your computer and sends them to devices you connect to the Arduino. You can connect many types of devices to an arduino, including LEDs, sensors, and input devices such as buttons. You can even attach an LED screen to display things!
Pins/Components
There are many different Arduino boards, but we are focused on the Arduino UNO, the board in your kit.
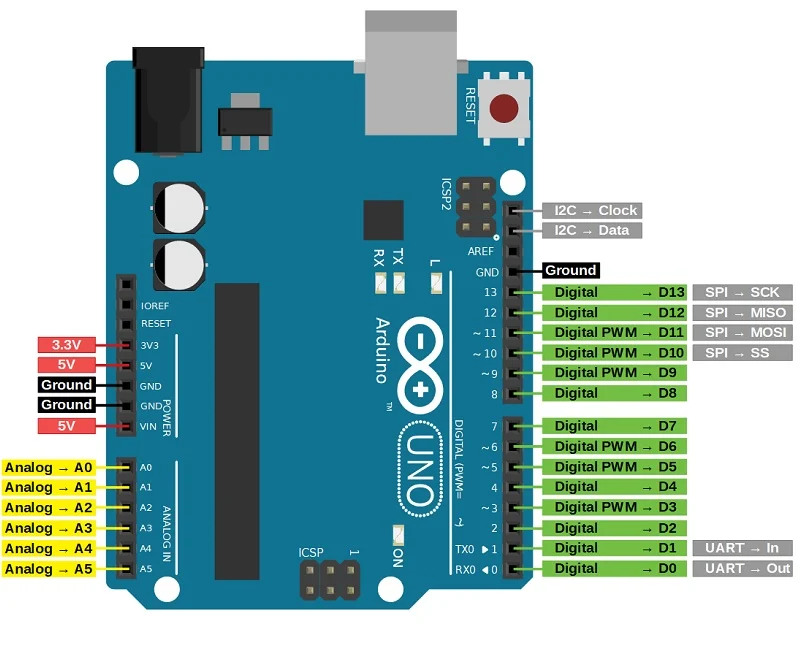
The analog pins are for analog input, which ranges from 0-5 V. This is different from the digital pins, on the right side of the board in the schematic above, which only have a HIGH and LOW signal (0 OR 5 V).
PWM pins are a special type of digital pin. They are essentially a digital pin that can simulate an analog output — in other words, an output between 0 and 5 V. They do this through a PWM wave, which has a certain cycle that averages to a certain voltage.
The arduino also has power pins. A 5V pin provides power and a GND pin provides a reference voltage for that power source.
What is code?
Code is a set of instructions you give to a computer in order to accomplish a task. In our case, the computer is the arduino. For Arduino, you will naturally pick up the C++ language along the way because a lot of the language is explained through the Arduino functionality and how the code is written.
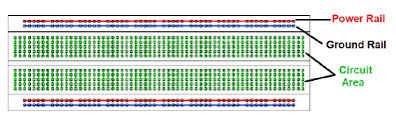
What is a breadboard?
Breadboards allow to easily connect components on a circuit. Both the ground and power rails are electrically connected horizontally down the breadboard as seen by the red and blue lines. This means that anything connected to a power rail (ie. 5V) can be shared by anything on that rail. The circuit rails are electrically connected vertically.
Hands On:
Make sure you connect your Arduino to your computer using the USB-B cable, which is typically blue. Be sure to select the board in the IDE as the Arduino UNO.
Note: To select the board, go to Tools->Board->Arduino AVR Boards, and find the Arduino UNO option.
This is a hello world code for Arduino. The Setup code runs once.
Try running this code on your IDE, and uploading to the Arduino! Typing it out might seem tedious, but it's the best way you will learn the language and structure.
void setup () {
// Start serial communication at a baud rate of 9600
// This is how we can send text from the arduino
Serial.begin (9600);// 9600 baud rate
}
// Loop code runs repeatedly
void loop () {
    // write "Hello, World!" to serial
    // We can view this text in the Serial Monitor
    Serial.write ("Hello, World!");
    // Send Hello World every 1000 ms (1 second)
    delay (1000);
}
How do you run the code? Just click the right arrow button on the top left of the IDE!